
Hello crafty friends, Davina here with my very first post for Butterfly Reflections Ink . I’m so excited to be joining this team of extremely talented cardmakers, and couldn’t wait to make a project to share.
Currently my favorite card designs have been the tall slimline cards, that I have been creating a lot of lately. But only a couple weeks go I trimmed down the design to make a shorter slimline card. The measurement is 6.25 x 3.5 (the exact size of an iPhone plus) and it is perfectly sized to fit in your hand, and a regular sized envelope (3 5/8 x 6.5).

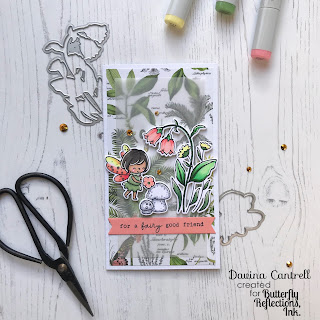
I came across a piece of vintage looking botanical paper in my stash and was instantly inspired to use the new Fairy Garden set by Hello Bluebird. I wanted the patterned paper to to be relevant, so after cutting down the paper to 6 x 3.25, I layered a piece of Lawn Fawn Vellum that was trimmed a half inch smaller on top. I stamped my images using my stamp platform, then colored with Copic markers using colors I found in the paper, then die cut using the coordinating Fairy Garden Dies. I also cut the same images out of a scrap piece of fun foam so that I could make thick mounted images. I always attach my die cuts to fun foam using Lawn Fawn Glue Tube then place under an acrylic block so they
can dry nice and flat.


I was so happy with how different this looked compared to what I’ve been making recently, and decided to add the coordinating botanical palm paper into the simple plain envelope for a little “extra”. I traced the envelope with a pencil then cut out with my paper trimmer. Then I trimmed a half inch off of the top so the envelope adhesive would be useable. Now my little set is perfect and ready for gifting.

Thank you for stopping by and I hope you have enjoyed seeing how I made this card ,
Davina

Currently my favorite card designs have been the tall slimline cards, that I have been creating a lot of lately. But only a couple weeks go I trimmed down the design to make a shorter slimline card. The measurement is 6.25 x 3.5 (the exact size of an iPhone plus) and it is perfectly sized to fit in your hand, and a regular sized envelope (3 5/8 x 6.5).

I came across a piece of vintage looking botanical paper in my stash and was instantly inspired to use the new Fairy Garden set by Hello Bluebird. I wanted the patterned paper to to be relevant, so after cutting down the paper to 6 x 3.25, I layered a piece of Lawn Fawn Vellum that was trimmed a half inch smaller on top. I stamped my images using my stamp platform, then colored with Copic markers using colors I found in the paper, then die cut using the coordinating Fairy Garden Dies. I also cut the same images out of a scrap piece of fun foam so that I could make thick mounted images. I always attach my die cuts to fun foam using Lawn Fawn Glue Tube then place under an acrylic block so they
can dry nice and flat.

I stamped the sentiment onto a piece of colored card stock then cut out a banner using Lawn Fawn Lawn Cuts. I used a tape runner to attach the banner to the vellum, then used tape runner on the back of the vellum (under the banner) to adhere it to the paper panel. Then I attached the images using the fun foam adhesive back. I carefully pulled the vellum back and used some liquid glue where the images were, so that it would not be visible from the front. I added a light sprinkling of beautiful metallic Pretty Pink Posh Gold Jewels to finish it off.


Thank you for stopping by and I hope you have enjoyed seeing how I made this card ,
Davina
I absolutely LOVE this Davina!! What a fun tip to use fun foam to add interest to the fairy image!! Love that and will have to give it a try!
ReplyDeleteSuch a creative, beautiful card. I love the composition and how you lined the envelope with coordinating paper. Well done!
ReplyDeleteLove your sweet fairy card!
ReplyDelete