

Good Morning Crafty Friends, Julianne here bringing you some welcome/thank you cards. I created these cards using some older Altenew products and giving them new life. I love digging into my older stamps and creating something new with them.
 The stamps I decided on using where the Altenew Neighborhood Stamp Set as well as the Altenew Leafy Wreath Die. I started out by using the Leafty Wreath Die to die cut a variety of different card stocks (two shades of green, vellum, and some gold glitter card stock). I wanted my wreaths to look really full, depending on the look you are going for you could die cut less or even more. The trick to making the wreath look really full is adhering it different each time, making sure that you are moving the leaves around so that they are in different places.
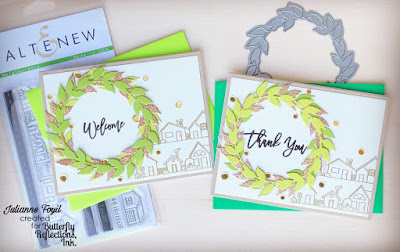
 Once I had all the wreaths ready to go it was time to start working on my background, cutting down some white card stock just under an A2 size. I figured out where I wanted my wreath to be on the card and with a pencil lightly drew an outline. I wanted the rest of the card to be very simple so that the main focal image with the wreath, with the Neighborhood Stamp Set I used the row of houses and heat embossed them with WOW Gold Embossing Powder. Once I heat embossed both rows of houses I started adhering the wreaths to the card, it doesn't matter what order you put the colors of card stock just make sure to shift the leaves. Using the Neighborhood Stamp set I stamped the two script sentiments that were included in the center of the wreaths. I finished off each card with some gold sequins from Pretty Pink Posh.


As I was creating these I couldn't help but think these would also make some super cute Christmas cards, so just by changing up the sentiments as well as die cutting some red glitter card stock to make berries I was able to get some super easy Christmas cards. I love how they came out and they were so easy to put together.

Thank you all so much for stopping by to check out my cards, make sure to check out all the great inspiration from the rest of the design team. I can't wait to see what you all create, Happy Crafting.
These came out great!!!
ReplyDelete