
Hey there Crafty Friends! Davina here to share some more August Mood Board Inspiration. It is mid August and I’ve made my first Halloween card of the year for the Butterfly Reflections Ink Blog . I used a wonderfully cute and spooky set released last year by Hello Bluebird called Halloween Fun. I really love that BRI carries the Hello Bluebird brand and appreciate that the matching dies and individual cover plates are so reasonably priced because I always make sure to purchase the stamps and matching dies. Today’s card uses a soft and shadowy technique that I have been practicing, and I love the different aesthetic that it gives to my projects. Once again I’ve use the August Mood/Color Board, which s rich in beautiful jewel tones, but the outcome is completely different.

I wanted my card to be bold and bright, but at the same time give a soft and spooky twilight feel. And I think I’ve accomplished my goal. Using the Gallery Frame #4 Coverplate die (which follows along with my desire to use more cover plates since I’ve acquired so many) I was easily able to to use a few cute images to fill the entirety of my card face.

I began by stamping my images onto Neenah Solar Bright White cardstock using my stamp platform. I know that I repeat this sentence in every post but I assure you, use one. Whether it is a Misti or a Tonic Stamp Platform etc... use it. My stamped images always look dark, solid, and crisp, and your cards will look a million percent better with one addition to your routine. Notice my speech bubbles?
They are solid black and I didn’t need to go in with a black pen to fill any spaces. After stamping my images, I gathered my Copic Markers using my color choices that follow along with the color board. Instead of the dark bold tones that I see in my last 2 cards, I went with the lighter values in each color family.

For each image that I colored, I used a shadowing technique that requires cool gray tone markers. While the ink was still damp I quickly and lightly outlined in C1, then filled in with C0, and added a very tiny amount of C2 in any crevices that I felt need more shadow. I did this on every colored image, even those light aqua ghosts. After die cutting all of my images I highlighted with a white gel pen. I then cut out the frame several times. Once from Bristol Smooth Cardstock, twice from heavy smooth black cardstock, and once from a striped patterned paper.

I attached the center pieces of Bristol paper together from behind using Washi tape then taped it to my work surface for inkblending. I wanted each little rectangle to have a glowing blue center. So I began by blending some white distress ink to the center of each panel with my blending brush. Then I followed with tumbled glass distress oxide ink. Filling in most of the rectangles with out worrying about the corners. Then I used faded jeans Distress Oxide and blended in all the way around without filling in the center. Finally I used black soot to carefully ink around the edges. I finished by going into the center again with more tumbled glass to lighten and blend. I splattered with water then white opaque ink.

While it was all still taped down I used a Heffy Doodle Starfall stencil to apply some glittery stencil paste across the whole panel. I lifted it up, tossed out the border frame and put the rectangles aside to dry while I cleaned up all of my disaster, and began to build my frame. I glued together the remaining 3 inner borders, putting the stripes on the bottom and black on top, then I glued together the 3 outer frames, but with the stripes on top. I popped in my inked rectangles and taped together the back with regular clear scotch tape. I adhered my images using my Lawn Fawn Glue Tube. Then decided to add some tiny google eyes to the bats that I had in my stash. Finally, I stamped the sentiment and cut it out with a Banner die that I trimmed to length. Although I glued it down, I still added a staple to the side for visual detail.
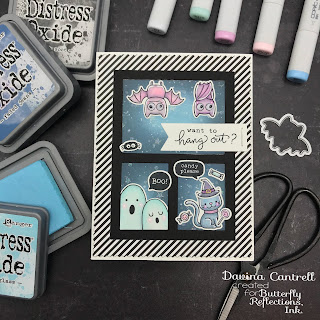
I really loved how it all looked and attached it to a plain white cardbase using 1/4 inch Scor Tape. I made sure to add several pieces across the taped area to make sure everything would be secure and flat and when it was on straight I used my fingers to press all over for maximum adhesion.
This spooky little card could not be any cuter and I hope that you try your hand at some of the techniques that I have explained in this post. Thank you so much for dropping in,
Davina

I wanted my card to be bold and bright, but at the same time give a soft and spooky twilight feel. And I think I’ve accomplished my goal. Using the Gallery Frame #4 Coverplate die (which follows along with my desire to use more cover plates since I’ve acquired so many) I was easily able to to use a few cute images to fill the entirety of my card face.

I began by stamping my images onto Neenah Solar Bright White cardstock using my stamp platform. I know that I repeat this sentence in every post but I assure you, use one. Whether it is a Misti or a Tonic Stamp Platform etc... use it. My stamped images always look dark, solid, and crisp, and your cards will look a million percent better with one addition to your routine. Notice my speech bubbles?
They are solid black and I didn’t need to go in with a black pen to fill any spaces. After stamping my images, I gathered my Copic Markers using my color choices that follow along with the color board. Instead of the dark bold tones that I see in my last 2 cards, I went with the lighter values in each color family.


I really loved how it all looked and attached it to a plain white cardbase using 1/4 inch Scor Tape. I made sure to add several pieces across the taped area to make sure everything would be secure and flat and when it was on straight I used my fingers to press all over for maximum adhesion.
This spooky little card could not be any cuter and I hope that you try your hand at some of the techniques that I have explained in this post. Thank you so much for dropping in,
Davina
Comments
Post a Comment