
Sparkle and Shine

 Happy Friday, Everyone! I hope you all had a wonderful Thanksgiving with your loved ones. This was the first year that we didn't spend the holiday with extended family. We still made a big dinner, and my son baked pumpkin pie...which we haven't eaten yet because we were so full! Now that Thanksgiving is over, it's time to really focus on getting all those holiday cards made. I'm sharing a pair of cards today that are full of sparkle and shine. You can find all of the supplies in the Butterfly Reflections, Ink. online store.

I started with the rectangular card. I just recently got this Snowflake Circle Frame die and have been so excited to use it. I decided to use a piece of holographic paper, and wow - what an impact. Because this die cuts out the interior detail, I first cut the holographic paper with a larger circle die so that I could create the look of an ornament. I knew I wanted to make a shaker card, so I got a piece of acetate and white heat-embossed the "Joy" sentiment. This sentiment comes from the Hand-Lettered Holiday Greetings set that I find myself using all of the time. I then used Scor-Tape to adhere the acetate to the back of the ornament cutout. 

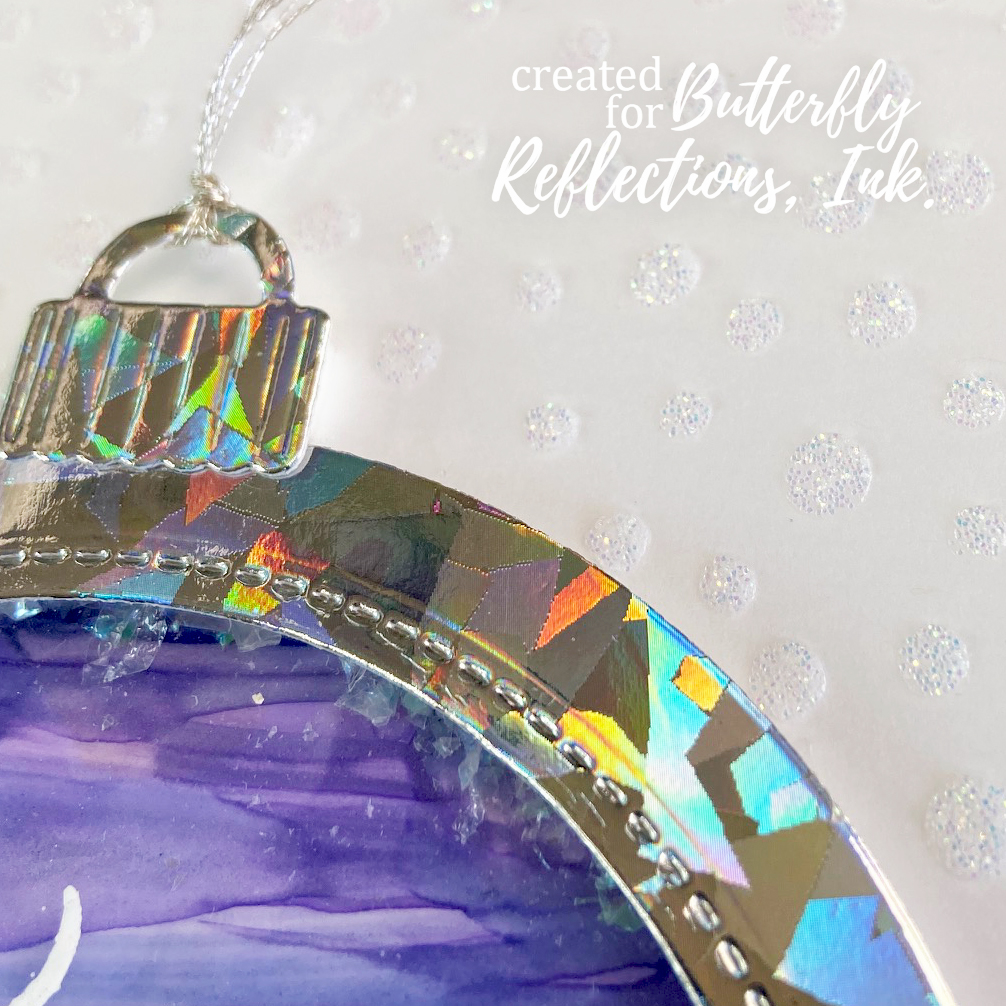
For the shaker element, I first needed a background. I had an alcohol ink piece that I had made recently that I wasn't really crazy about. The great thing about alcohol ink backgrounds, though, is that you can always find a way to use part of it, even if you don't like the piece as a whole. I used foam tape around the back frame of the ornament and then used Shaved Ice for the inside of the shaker. I love, love, love Shaved Ice. Once the shaker element was finished, I added to the look of an ornament by using the ornament cap die from the Radiant Ornament Layer Set (Layer A). I cut that out of the same holographic paper. I then tied some thin silver string onto the "hook." I wanted the card base to have some interest, so I stenciled on some Nuvo glimmer paste using the MFT Snow Flurry stencil. Finally, I adhered my ornament to the card base using liquid glue

I really hadn't planned on making more than one card, but once I was finished, I just had to make another. I don't usually do that because I don't like making the same card twice. So, I decided to alter it a little bit and make a round card. This way, the entire card actually looks like an ornament. To do this, I just cut two large circles out of white card stock. On one of the circles, I scored a line about a 1/2" from the edge. This acts as the hinge so that the card can open. I put Scor-Tape on the hinge and then adhered the second circle on top of that first one. 

I created the shaker element the exact same way as the other card, this time using a different alcohol ink background. I cut a slightly larger circle out of teal card stock to go in back of the shaker element. Before adhering everything to the front of the card base, I stamped the sentiment inside, right under the hinge. This holographic paper is so amazing! At first glance, it looks silver. But it takes on whatever color is around it, and it is so cool when you move it around. These cards would still look great with some sort of metallic or mirror card stock, as well.


And those are my cards for today. I hope they put you into a festive mood, and if you have as many holiday cards to crank out as I do, I hope this gives you motivation! Thank you so much for joining me today.

Wishing you a crafty day,

Allison

Comments

Popular posts from this blog

Baby Tags featuring the We R Memory Keepers Fuse Tool!

Happy Monday! This is Kim Hamilton and I am so very excited to be sharing my first post with you for Butterfly Reflections Ink! This is making my first day back to work after a two-week break a happy one! I am sharing baby gift tags today, one of my friends is expecting and not sure what she is having so I made one of each! I used my  We R Memory Keepers Fuse Tool  for the first time and loved it! I cut my own  Tim Holtz watercolor paper  to the size of tag I wanted (2 3/4 x 4 1/4) and cut the edges with my trimmer.  I stamped my sentiments that are by  Lawn Fawn Hello Baby  with VersaMark ink and used white embossing powder. For the girl tag I used a mix of Spun Sugar, Picked Raspberry and Abandoned Coral  Distress Inks  and for the boy tag I used Peacock Feathers, Cracked Pistachio and Twisted Citron  Distress Inks .  I sprayed both tags with some water and dabbed it off. I then stamped my images by My Favorite Things  Snuggle Bunnies  for the girl and Magical Dragons for th

Painting backwards....

Hello, hello!  Norine here from The Velvet Lemon blog .  It's been a week for introductions hasn't it, but let me just say how delighted I am to have been invited to join such a talented group of paper crafters, and to contribute here at Butterfly Reflections Ink!   Today I'm sharing with you, some cards I made by working backwards.  What do I mean, you wonder?  Well, it's a technique I sometimes enjoy doing, where you "smoosh" your water based ink pads on a craft mat, mist the colors with water and then drag your water color paper through it to create a pretty mess of color.     For today's cards, I wanted a blend of blues and greens (always a crowd pleaser) and yellows/pinks.  You will always be happier with the results when you keep the green/blues from overlapping with the yellow/pinks, because that just produces an unappealing mud color.   I used a variety of Tim Holtz Distress Inks for this project, but any water based inks w

Altenew’s 4th Anniversary Blog Hop Day 3 + Giveaway

Hey, hey BRI friends!  We're hopping today to celebrate the 4th Birthday of Altenew , one of our favorite stamping companies!  You should have arrived here from the Altenew blog , and we're glad you're here to share the excitement! There are prizes and inspiration and it's going to be FUN! With you today, is Norine from The Velvet Lemon  creating for Butterfly Reflections Ink  and I have some projects to share today, that I made using some recently released Altenew products .   First up, are these two cards created with the Mega Succulent stamp set .   I stamped the image onto water color paper using the MISTI , then turned on the music and sat and colored.   I used Faber Castell watercolor pencils so I could more easily control where the color would sit and then painted with a water brush .  I stamped the sentiment onto a piece of vellum, heat embossed with clear embossing powder to ensure that the ink wouldn't smudge, then tore the vel