
Little LLama Snowglobe Fun

Hello crafty friends! Peggy here with some Christmas inspiration with the beautiful products from Mama Elephant. I combined some older products with one of the newly released grid covers to create a super fun shaker card. So, Llama tell you how I made this card!

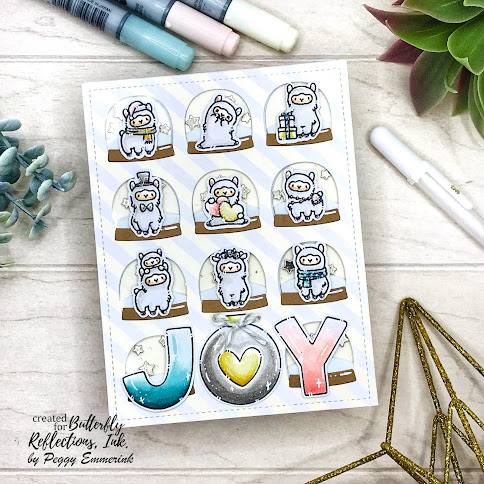
When it came out last month, I totally fell in love with the Globies Grid Cover. Mama Elephant is known for their Little Agenda stamp sets and with the enormous diversity in Grid Cover dies, the possibilities are endless. I started by stamping out some images from the Little Llama Agenda that would be suitable for Christmas, as well as the letters JOY from the Joy Ornaments set. I stamped with Lawn Fawn Jet Black ink, which is my favorite alcohol marker friendly ink. Next, I colored the images with my copics and fussy cut them out. I love the Tim Holtz Serrated Scissors for this because it gives a little more grip.

Next, I used the Globies Grid Cover to cut out some foam to create my shaker pockets, as well as the front of the card from some of the cream colored Lawn Fawn Let it Shine paper. I adhered the foam to a standard size white card base. Because I'm thrifty, I used the patterned paper and foam 'waste' pieces to inlay the backing and snowbanks in the tiny snowglobes. 

Using the tiny stars die that is included in Mama Elephant's Slim Scenescape Builder, I cut a lot of little stars from some Lawn Fawn Metallic cardstock to fill my shaker pockets. Before I filled them, I used a powder applicator to remove any unwanted stickiness. I glued a piece of clear acetate over the top and sealed it all with my patterned paper cover piece.

The Globies Grid Cover comes with a small die to quickly cut several bases for the tiny snowglobes. I cut these from Lawn Fawn Paper Bag cardstock and adhered them with liquid glue. I adhered my little llama images and letters over the top of the snowglobes. I finished my card with some white gelly roll pen accents, a touch of Glossy Accents and a tiny bow at the top of the bauble that spells the letter O.

I hope you are inspired to get cracking on Christmas with me!

Long distance hugs,

Peggy

Come say hi on Instagram @peggyemmerink

Comments

Popular posts from this blog

Baby Tags featuring the We R Memory Keepers Fuse Tool!

Happy Monday! This is Kim Hamilton and I am so very excited to be sharing my first post with you for Butterfly Reflections Ink! This is making my first day back to work after a two-week break a happy one! I am sharing baby gift tags today, one of my friends is expecting and not sure what she is having so I made one of each! I used my  We R Memory Keepers Fuse Tool  for the first time and loved it! I cut my own  Tim Holtz watercolor paper  to the size of tag I wanted (2 3/4 x 4 1/4) and cut the edges with my trimmer.  I stamped my sentiments that are by  Lawn Fawn Hello Baby  with VersaMark ink and used white embossing powder. For the girl tag I used a mix of Spun Sugar, Picked Raspberry and Abandoned Coral  Distress Inks  and for the boy tag I used Peacock Feathers, Cracked Pistachio and Twisted Citron  Distress Inks .  I sprayed both tags with some water and dabbed it off. I then stamped my images by My Favorite Things  Snuggle Bunnies  for the girl and Magical Dragons for th

Painting backwards....

Hello, hello!  Norine here from The Velvet Lemon blog .  It's been a week for introductions hasn't it, but let me just say how delighted I am to have been invited to join such a talented group of paper crafters, and to contribute here at Butterfly Reflections Ink!   Today I'm sharing with you, some cards I made by working backwards.  What do I mean, you wonder?  Well, it's a technique I sometimes enjoy doing, where you "smoosh" your water based ink pads on a craft mat, mist the colors with water and then drag your water color paper through it to create a pretty mess of color.     For today's cards, I wanted a blend of blues and greens (always a crowd pleaser) and yellows/pinks.  You will always be happier with the results when you keep the green/blues from overlapping with the yellow/pinks, because that just produces an unappealing mud color.   I used a variety of Tim Holtz Distress Inks for this project, but any water based inks w

Altenew’s 4th Anniversary Blog Hop Day 3 + Giveaway

Hey, hey BRI friends!  We're hopping today to celebrate the 4th Birthday of Altenew , one of our favorite stamping companies!  You should have arrived here from the Altenew blog , and we're glad you're here to share the excitement! There are prizes and inspiration and it's going to be FUN! With you today, is Norine from The Velvet Lemon  creating for Butterfly Reflections Ink  and I have some projects to share today, that I made using some recently released Altenew products .   First up, are these two cards created with the Mega Succulent stamp set .   I stamped the image onto water color paper using the MISTI , then turned on the music and sat and colored.   I used Faber Castell watercolor pencils so I could more easily control where the color would sit and then painted with a water brush .  I stamped the sentiment onto a piece of vellum, heat embossed with clear embossing powder to ensure that the ink wouldn't smudge, then tore the vel