
Yippee Birthday Card

 Hi everybody! It's Cassie from Creatively Cass, back today to share a card I made with you. Today's card was inspired by a card I made a long time ago where I had a volcano shaker. I wanted to do a similar design except this time I wanted the shaker to be coming out of the bottom of a piñata, as if it were breaking open. Here's a look at the final card. 


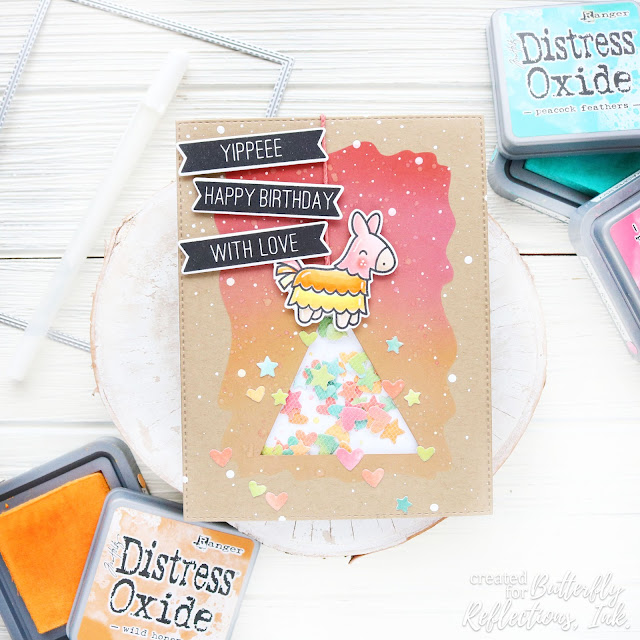
I love the rainbow colors on this and the fun interactive element. I haven't made a shaker card in so long, I was definitely reteaching myself some things today! I started with a piece of kraft card stock and die cut a stitched rectangle from it. I used the MFT stencil Watercolor Wash Rectangle and Distress Oxide inks Candied Apple, Abandoned Coral, Picked Raspberry, and Wild Honey to get this cute watercolor centerpiece on the card. From there I used a ruler and craft knife to cut a triangle in the lower middle portion of the card. I tried so hard to measure and make it centered and even, however that is not my strong suit. In the end I don't think too many people would notice that it is off a little, with everything else going on, so don't be too hard on yourself if measuring isn't your thing either! I added some tulle to the back of the kraft cardstock to be my barrier and hold the bits of the shaker in. I like the texture this adds, but you could certainly do acetate too! I die cut out a bunch of shapes using the Hearts and Stars Skinny Tag die from Lawn Fawn. To get the multitude of colors I ink blended Distress Oxide ink onto white cardstock in colors Abandoned Coral, Candied Apple, Twisted Citron, Wild Honey, Picked Raspberry, and Peacock Feathers. This makes for easy matching die cut pieces! 

Once the shaker was together I moved on to the other elements of the card. I stamped the piñata from the Lawn Fawn mini stamp set Year Seven and colored it in with some Copic markers. I don't have the dies for this so fussy cutting it was! Once that was done I attached some coral string to it and foam taped it to the card front. The last thing to do was the sentiment. 
I wasn't sure what to do for a sentiment, so I dug through all my stamp sets. I settled on these cute banner stamps from the Heffy Doodle set Bold Banner Sentiments. I love the black contrast against all those colors. I think it helps make it pop. Using the matching dies, I cut those out and attached them with foam tape. Using some of the remaining stars and hearts dies I added them to the front of the card along with white gel pen dots and larger paint dots. And that was it for this card! I hope you enjoyed it and it inspired you to make a piñata shaker! Thanks so much for stopping by. I'll see you again soon with another card!


Comments

Popular posts from this blog

Baby Tags featuring the We R Memory Keepers Fuse Tool!

Happy Monday! This is Kim Hamilton and I am so very excited to be sharing my first post with you for Butterfly Reflections Ink! This is making my first day back to work after a two-week break a happy one! I am sharing baby gift tags today, one of my friends is expecting and not sure what she is having so I made one of each! I used my  We R Memory Keepers Fuse Tool  for the first time and loved it! I cut my own  Tim Holtz watercolor paper  to the size of tag I wanted (2 3/4 x 4 1/4) and cut the edges with my trimmer.  I stamped my sentiments that are by  Lawn Fawn Hello Baby  with VersaMark ink and used white embossing powder. For the girl tag I used a mix of Spun Sugar, Picked Raspberry and Abandoned Coral  Distress Inks  and for the boy tag I used Peacock Feathers, Cracked Pistachio and Twisted Citron  Distress Inks .  I sprayed both tags with some water and dabbed it off. I then stamped my images by My Favorite Things  Snuggle Bunnies  for the girl and Magical Dragons for th

Painting backwards....

Hello, hello!  Norine here from The Velvet Lemon blog .  It's been a week for introductions hasn't it, but let me just say how delighted I am to have been invited to join such a talented group of paper crafters, and to contribute here at Butterfly Reflections Ink!   Today I'm sharing with you, some cards I made by working backwards.  What do I mean, you wonder?  Well, it's a technique I sometimes enjoy doing, where you "smoosh" your water based ink pads on a craft mat, mist the colors with water and then drag your water color paper through it to create a pretty mess of color.     For today's cards, I wanted a blend of blues and greens (always a crowd pleaser) and yellows/pinks.  You will always be happier with the results when you keep the green/blues from overlapping with the yellow/pinks, because that just produces an unappealing mud color.   I used a variety of Tim Holtz Distress Inks for this project, but any water based inks w

Altenew’s 4th Anniversary Blog Hop Day 3 + Giveaway

Hey, hey BRI friends!  We're hopping today to celebrate the 4th Birthday of Altenew , one of our favorite stamping companies!  You should have arrived here from the Altenew blog , and we're glad you're here to share the excitement! There are prizes and inspiration and it's going to be FUN! With you today, is Norine from The Velvet Lemon  creating for Butterfly Reflections Ink  and I have some projects to share today, that I made using some recently released Altenew products .   First up, are these two cards created with the Mega Succulent stamp set .   I stamped the image onto water color paper using the MISTI , then turned on the music and sat and colored.   I used Faber Castell watercolor pencils so I could more easily control where the color would sit and then painted with a water brush .  I stamped the sentiment onto a piece of vellum, heat embossed with clear embossing powder to ensure that the ink wouldn't smudge, then tore the vel