
Dear Friend

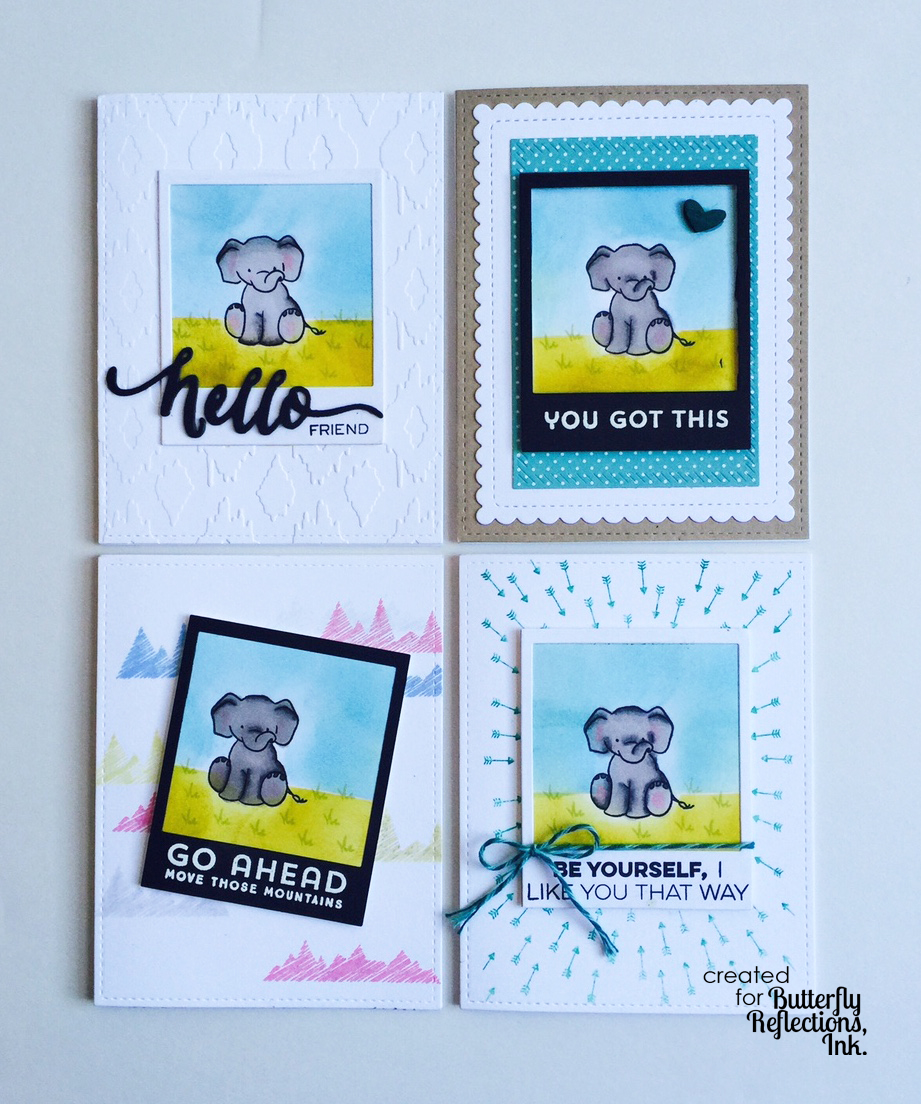
Rubeena here sharing a few cards using various sets but with the same focal image. Since I have to set aside time to craft each week, I like being able to make multiple cards (to feel more productive?!) ;-) Each one is a little different.

First, I stamped the sitting elephant from WPlus9's very popular Unforgettable onto large white cardstock four times. I used a few warm grays to color the elephants. Using micropore tape, I masked off half of the elephant so I could blend in the bottom part with Distress Ink in Crushed Olive as grass and Tumbled Glass as sky (I removed the tape to cover the colored side once one side was blended. I hope that made sense! I was careful to color around the elephant. I stamped one of the grass stamps from Unforgettable in random spots around each elephant.


Using white and black cardstock, I cut out some polaroid frames. I glued each one around the elephants and then fussy cut behind it. For one of the cards, I decided to stamp Create a Smile's Arrows stamp as a background. It looks great in a bold color or a subtle one! I added the sentiment from MFT's Friends Like Us on the bottom portion of the frame. I added a matching color of twine and added it with foam tape for dimension.


For the second card, I used a really fun embossing folder for the background and then glued down the frame over it. I cut out WPlus9's Hand Lettered Hello die from black cardstock four times and glued all the pieces with glossy accents. I stamped the word 'friend' from WPlus9's Hand Lettered Hello set and added the hello to the left of it.


For the third card, I stamped the mountain silhouette from WPlus9's Encouraging Words set on white cardstock. I stamped the sentiment from the same set in VersaMark and heat embossed it using white embossing powder.


For the last card, I stamped the sentiment from Encouraging Words in VersaMark and heat embossed it, too. I added some layers - the polka dot pattern paper is from Lawn Fawn's Let's Polka paper pad and die-cut using MFT's Die-namics Inside & Out Diagonal Stitched Rectangle Stax. The white piece was die-cut with the scalloped die from WPlus9's Sunshine Layers. I added a heart wood veneer that was colored using Distress Marker in Peacock Feather.


Here's a look at all of them:


Hope you enjoyed these cards! Thanks for stopping by!

Comments

  1. Hello greetings and good wishes.

    I am amazed at the specialized skill and creativity involved in making these lovely cards.

    The end result is fabulous.

    Best wishes

    ReplyDelete
  2. These cards are fantastic ! I love the design of each one !
    Hugs,
    Mayra

    ReplyDelete
  3. awwwww...love this adorable set of cards!

    ReplyDelete
  4. That ellie is adorable!! Think the first one is my fave :)

    ReplyDelete

Post a Comment

Popular posts from this blog

Baby Tags featuring the We R Memory Keepers Fuse Tool!

Happy Monday! This is Kim Hamilton and I am so very excited to be sharing my first post with you for Butterfly Reflections Ink! This is making my first day back to work after a two-week break a happy one! I am sharing baby gift tags today, one of my friends is expecting and not sure what she is having so I made one of each! I used my  We R Memory Keepers Fuse Tool  for the first time and loved it! I cut my own  Tim Holtz watercolor paper  to the size of tag I wanted (2 3/4 x 4 1/4) and cut the edges with my trimmer.  I stamped my sentiments that are by  Lawn Fawn Hello Baby  with VersaMark ink and used white embossing powder. For the girl tag I used a mix of Spun Sugar, Picked Raspberry and Abandoned Coral  Distress Inks  and for the boy tag I used Peacock Feathers, Cracked Pistachio and Twisted Citron  Distress Inks .  I sprayed both tags with some water and dabbed it off. I then stamped my images by My Favorite Things  Snuggle Bunnies  for the girl and Magical Dragons for th

Painting backwards....

Hello, hello!  Norine here from The Velvet Lemon blog .  It's been a week for introductions hasn't it, but let me just say how delighted I am to have been invited to join such a talented group of paper crafters, and to contribute here at Butterfly Reflections Ink!   Today I'm sharing with you, some cards I made by working backwards.  What do I mean, you wonder?  Well, it's a technique I sometimes enjoy doing, where you "smoosh" your water based ink pads on a craft mat, mist the colors with water and then drag your water color paper through it to create a pretty mess of color.     For today's cards, I wanted a blend of blues and greens (always a crowd pleaser) and yellows/pinks.  You will always be happier with the results when you keep the green/blues from overlapping with the yellow/pinks, because that just produces an unappealing mud color.   I used a variety of Tim Holtz Distress Inks for this project, but any water based inks w

Altenew’s 4th Anniversary Blog Hop Day 3 + Giveaway

Hey, hey BRI friends!  We're hopping today to celebrate the 4th Birthday of Altenew , one of our favorite stamping companies!  You should have arrived here from the Altenew blog , and we're glad you're here to share the excitement! There are prizes and inspiration and it's going to be FUN! With you today, is Norine from The Velvet Lemon  creating for Butterfly Reflections Ink  and I have some projects to share today, that I made using some recently released Altenew products .   First up, are these two cards created with the Mega Succulent stamp set .   I stamped the image onto water color paper using the MISTI , then turned on the music and sat and colored.   I used Faber Castell watercolor pencils so I could more easily control where the color would sit and then painted with a water brush .  I stamped the sentiment onto a piece of vellum, heat embossed with clear embossing powder to ensure that the ink wouldn't smudge, then tore the vel