
Wishing You a Happy Birthday with Audrey

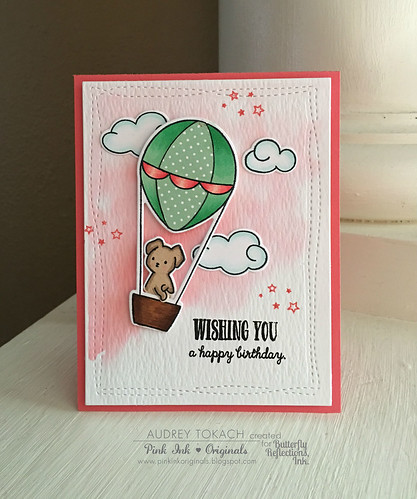
Hello there!  Audrey here with a birthday card to share with you today!  I started off by watercoloring a background for my card.  I taped a piece of the Tim Holtz Distress Watercolor Cardstock to a board and wet the paper.  I tapped the Abandoned Coral Distress ink on my acrylic block, and added some water, and then did a watercolor wash on the wet paper to give a very subtle color.  I wanted the bottom right of the cardstock to stay white to look like clouds.  After it was dry, I diecut the watercolor piece with the Avery Elle Wonky Stitches frame.  I stamped and colored the hot air balloon, clouds and puppy from the WPlus9 Going Places stamp set, and then diecut them with the coordinating dies.  I paper pieced the center of the balloon with Lawn Fawn Let's Polka Mon Amie patterned paper before popping it up with foam tape.  I added the clouds with a glue pen, and stamped a sentiment and a few star clusters from the WPlus9 Wishing You stamp set.  Then I popped the entire panel up on a coral card base using foam tape.

Wishing you a happy birthday

I hope you like it!  Thanks so much for stopping by! :)

Comments

  1. Such a sweet card! Love the watercoloring and color choice!

    ReplyDelete

Post a Comment

Popular posts from this blog

Baby Tags featuring the We R Memory Keepers Fuse Tool!

Happy Monday! This is Kim Hamilton and I am so very excited to be sharing my first post with you for Butterfly Reflections Ink! This is making my first day back to work after a two-week break a happy one! I am sharing baby gift tags today, one of my friends is expecting and not sure what she is having so I made one of each! I used my  We R Memory Keepers Fuse Tool  for the first time and loved it! I cut my own  Tim Holtz watercolor paper  to the size of tag I wanted (2 3/4 x 4 1/4) and cut the edges with my trimmer.  I stamped my sentiments that are by  Lawn Fawn Hello Baby  with VersaMark ink and used white embossing powder. For the girl tag I used a mix of Spun Sugar, Picked Raspberry and Abandoned Coral  Distress Inks  and for the boy tag I used Peacock Feathers, Cracked Pistachio and Twisted Citron  Distress Inks .  I sprayed both tags with some water and dabbed it off. I then stamped my images by My Favorite Things  Snuggle Bunnies  for the girl and Magical Dragons for th

Painting backwards....

Hello, hello!  Norine here from The Velvet Lemon blog .  It's been a week for introductions hasn't it, but let me just say how delighted I am to have been invited to join such a talented group of paper crafters, and to contribute here at Butterfly Reflections Ink!   Today I'm sharing with you, some cards I made by working backwards.  What do I mean, you wonder?  Well, it's a technique I sometimes enjoy doing, where you "smoosh" your water based ink pads on a craft mat, mist the colors with water and then drag your water color paper through it to create a pretty mess of color.     For today's cards, I wanted a blend of blues and greens (always a crowd pleaser) and yellows/pinks.  You will always be happier with the results when you keep the green/blues from overlapping with the yellow/pinks, because that just produces an unappealing mud color.   I used a variety of Tim Holtz Distress Inks for this project, but any water based inks w

Altenew’s 4th Anniversary Blog Hop Day 3 + Giveaway

Hey, hey BRI friends!  We're hopping today to celebrate the 4th Birthday of Altenew , one of our favorite stamping companies!  You should have arrived here from the Altenew blog , and we're glad you're here to share the excitement! There are prizes and inspiration and it's going to be FUN! With you today, is Norine from The Velvet Lemon  creating for Butterfly Reflections Ink  and I have some projects to share today, that I made using some recently released Altenew products .   First up, are these two cards created with the Mega Succulent stamp set .   I stamped the image onto water color paper using the MISTI , then turned on the music and sat and colored.   I used Faber Castell watercolor pencils so I could more easily control where the color would sit and then painted with a water brush .  I stamped the sentiment onto a piece of vellum, heat embossed with clear embossing powder to ensure that the ink wouldn't smudge, then tore the vel