
Hi guys!
Erica here on the Butterfly Reflections Ink blog this fine day and I have a huge project to show you. I didn’t mean for it to get quite so big but I got on a roll and then it was nearly impossible to stop... Eh, it happens.
I’ve used the Woodland Critter Huggers diecut from Lawn Fawn, the coordinating Stitched Gift Card Pocket Lawn Cuts as well as lots of lovely Lawn Fawn card stock. Including Black Licorice, Ground Coffee, Chocolate Bar, Paper Bag, Vanilla Malt, Canned Pumpkin, Sunflower and Cilantro. I also used some plain white card stock and some random bits of pink I found in my stash.
If you know me from my other crafting adventures, you probably know I have a tendency to dive in the deep end with a new die, absolutely clueless and just fumbling along. If you think this time was different, I wish I could tell you that was true, alas... In my usual rebellious style, I just started die cutting bits and pieces and then puzzling them together. My first attempt ended up a horrid, super freaky looking raccoon. Or something along the raccoon-lines. I think it might even be offensive to raccoons to call this thing a raccoon, to be honest! He/it/the thing will be thrown in the bin. *shudders*

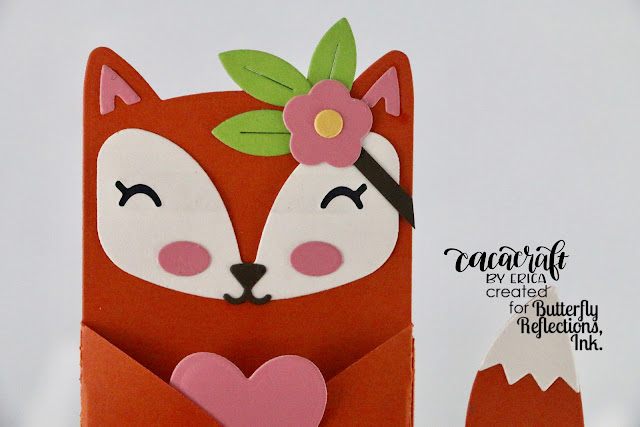
 Only, I added a ‘head band’ to add the flower too and I omitted the paws at the bottom. On a small strip of card stock I stamped ‘You make me happy’ from the Lawn Fawn set Happy Happy Happy and adhered it to the inside of the fox.
To cover up the fact there is a banner in there, I die cut a heart out of pink card stock for the fox to hold in its paws. Or rather, what I thought was card stock. You might see there is some typing on the back of it. That's because it turns out it was a paint sample, not card stock. I tried taking it off but couldn't get it off without ripping the fox's arm off. Typically, now I can't find the heart die I used, to cut another one to cover it up with...
On the back I added the little gift card pocket, which I had embossed with the little stitched heart that comes with the die and added a ‘hugs’ (the other die included in this set) cut out of Vanilla Malt card stock. To make it a bit prettier on the back I also added a flower on that side too.

I am very pleased with how this one turned out so I got bold and decided to try making a panda! Oh yes. Getting the Black Licorice card stock out, as well as some plain white, I got cutting again. For this one I used the biggest googly eyes I have in my stash as I’m pretty sure the tiny ones I used on my first freak.. erm.. critter was one of the reasons it didn’t turn out so good. See what I mean??

To create the big black circles that characterise a panda I used one of the planet dies from the Out Of This World Lawn cuts. I also cut out an oval (which is included in the Woodland Critter dies) for its nose in the same black card stock.

To make the nose more pronounced I added Glossy Accents to it after I had adhered all the bits and pieces. I also rounded the ears a bit as pandas do not have pointy ears. A light touch of pink Copic marker gave the panda rosy cheeks. For a fun look, I added a very thin strip of blue glitter card stock as a head band and added a white snowflake to it (also Lawn Fawn, this is called Stitched Snowflakes)

Next up I wanted to try a tiger! Yep, I was emboldened at this stage after my successful panda. Lol!
Using my darkest yellow card stock, Sunflower, I cut out the body as well as the big tail and set that aside. The tip of the tail and the tummy are cut out of Vanilla Malt. To get the tiger stripes I got the Ground Coffee card stock out and set out on a marathon cutting session... 28 (yes, twenty eight!) stripes later I was nearly broken. Eyes, eyebrows and nose was also cut out of the same card stock and another marathon session started, this time a glueing one. I used my craft mat as a measuring guide to make sure I got the stripes even on both sides of the body as I as glueing them down.

Once I had added the face I realised that it looked more like a cute little kitty than a tiger... so I proceeded to add the ear bits in pink and also a heart, which you can just about see peeking out when the arms are closed. On the back I also added the gift card holder which I had decorated with the embossed heart and hugs in the same Ground Coffee card stock.

I wasn’t about to give up on my tiger idea so I decided to try something else. This time I cut out the body and the big tail in water colour card stock and got my Distress Oxide inks out. I started with Fossilized Amber and blended it around the body but left a white tummy directly on the body rather than adding the diecut piece.

Next up was Spiced Marmalade with a hint of Wild Honey. They look very similar so I didn’t bother too much with blending these together. Once I was happy that the tiger had enough of a ‘tigery colour’ to him I got Vintage Photo and a blending sponge out, this one looks like a makeup sponge with it’s tear drop shape and it was the tip I used to create the stripes by dabbing it rather than smoothing it on the card stock. This worked a treat I thought!
 To finish him off I decided to use the big goggly eyes again, a nose cut out of Black Licorice card stock. Before I adhered it to the tiger I decided to draw some whiskers on him. Now this was a baaaaaaaaad idea. I was still sick when I was making these and I was feeling shaky and tired at this point... and then the second bad idea was to go straight to a marker rather than using a pencil to make sure I was happy with the whiskers before making them permanent. Memo to self: ALWAYS use pencil first, even when not sick and wobbly.
The funny thing about Distress Oxide inks is that they fade when they dry and my tiger, which was much darker before it dried, faded quite a bit so if anyone tries this I'd recommend going darker than you think you want. My husband also said to make the stripes much longer. To him this still looks like a kitty cat and I'm inclined to agree. BUT I'm not giving up on my tiger! I'm getting darker card stock and will keep trying.

After four successful projects in a row, the freaky first one (I’m not even going to risk offending the raccoons and call it a raccoon) is nearly a faint memory.

Now, I’m not saying that this is a quick project, even if you stick to just one, but boy these are so fun to make! Go on and try it yourself and go nuts with colour combos!
Here is one last close-up of each (successful) critter and then I really am done, promise!


Lots of love from Erica
Oh my goodness these are too cute!!
ReplyDeleteThank you so much, Cindy! I'm so glad you think so!
DeleteThese are fantastic!
ReplyDeleteAw, thank you so much, Kim! I had a blast making them (apart from that freaky first one)
DeleteThese are adorable, Erica!
ReplyDeleteThank you so much for saying that, Nance! I really appreciate it!
DeleteLove all these critters and each details you added, Erica! My fab is first baby tiger!!
ReplyDeleteHa! Someone else thinks they are tigers!! Even if it is baby tigers. Thank you so much, Dana!
DeleteWow! Absolutely adorable! Love all the gorgeous details.
ReplyDeleteThank you so much! I’m so glad you like them.
DeleteErica, your animals are splendidly done! Love all the different ways you made them and thank you for the tutorial!
ReplyDeleteYou are so very welcome, Bev! I'm glad you enjoyed the post and the how-to, and the don't-do-this, lol!
Delete