
Hi guys!
Erica on the Butterfly Reflections Ink blog today and I have three projects for you. All with the Pantone of the year: Ultraviolet! I must admit that purple isn't my favourite colour but I do know many people who love it. My mother is one. These projects are all done with her in mind. Her birthday isn't until May but you know, it's never to soon to plan ahead when you are making handmade gifts.

I used both Copic markers, alcohol inks and metallic mixatives on Yupo paper. I love seeing the inks mix on this paper, it's mesmerising! If you haven't tried it yet, you HAVE to!
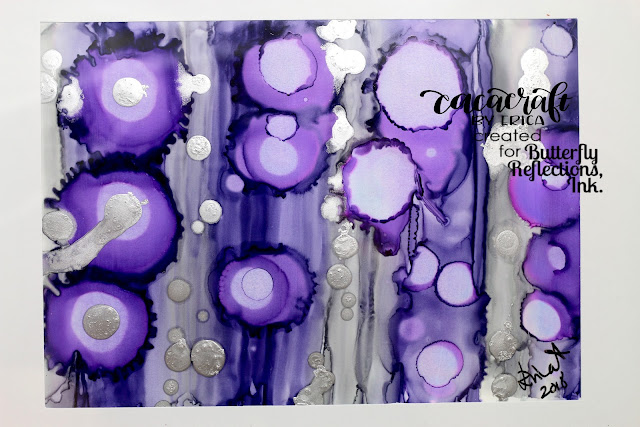
My first piece was done using grey and purple Copic markers directly on the Yupo paper, in wide stripes. Then, using a small natural sponge (you can usually find these in water colour supplies sections of stores) soaked in Copic blending solution, I dragged the sponge vertically along the stripes to activate the ink and the paper. I added slightly too much blending solution which led to very diluted colours, so I quickly grabbed my Purple Twilight alcohol ink and splattered it on the purple parts. On the grey pieces I used Silver metallic mixative, also in a splatter pattern. Lol! Splatter pattern!! That's a saying now, for sure!!
I played around quite a bit, adding more ink here and there, dripping more blending solution in the more opaque areas and adding generous amounts of the Silver mixative. To speed up the drying, I also used my heat gun on it, which led to some very cool bubbles in the silver mixative! Be very careful if you try this though. Alcohol inks are VERY flammable!

Setting this piece aside to dry completely and also flatten down a bit, I got working on another one. For this one I used an assortment of Copic markers directly on the Yupo paper again. I ended up using V09, V17, V22, V28 and BV08. Once I had covered the entire panel with colours, I again used my natural sponge soaked in blending solution and quickly dabbed it all over the piece. To avoid it blending out too much, I used the heat gun again.
Out of this panel I made a card and a matching gift tag using an Avery Elle rectangular diecut, the Hooray diecut from Neat & Tangled as well as the Celebrate stamp set, also from Neat & Tangled. (this last one is an affiliate link, which means if you click it and buy this set, I get a small commission at no extra cost to you. Thank you in advance! The reason this one is an affiliate link and the others aren't, is because it is not in stock at Butterfly Reflections Ink at the time of writing)
The diecut rectangle I adhered to a white card base using foam tape, and then using even more foam tape (L-O-V-E that stuff, can not get enough of it) I cut out both the pieces in the Hooray diecut set. These I layered with some purple card stock for the 'shadow' bit and silver glitter card stock for the actual Hooray word. There are a lot of layers to this card!

On dark grey card stock I stamped 'It's your birthday' in VersaMark ink and heat embossed it in white. This was cut down to a skinny strip (boy, that sounds saucy to my tired ears...) and adhered to the card with... duh duh duh... foam tape! Yeah, I have a problem. Send an intervention! Or no, please don't! I can't craft without that stuff, don't make me! Waaaaah!
As this is a birthday card and my Mamma loves a bit of bling (ah, that's where I got it from. It's so clear now) I added LOADS of Sparkling Clear sequins from Pretty Pink Posh. And I do mean loads. There is a dozen sequins on this card.
I had a slim strip of my purple panel left after I cut out the rectangle for the card and I decided to make a gift tag out it it. I kept it really simple and heat embossed 'Let's celebrate' in white on it, tied a big bow out of ultraviolet organza ribbon and a slim white satin ribbon, added that and boom. Done.

My big first piece was finally dry and flat enough to use without risking all that silver getting rubbed off and originally I had planned on making a rather dramatic card out of it but.... there is always a but when it's me we are talking about, isn't there? Ayayay. Well. I simply framed it with a plain white, box frame I had laying around and with that, I was all done. Three different projects, using the same supplies. Easy, peasy, right?? The fun thing with alcohol inks is that you will never, ever get two panels looking exactly the same so each one is totally unique. Doesn't get much more personalised when it comes to gifts now, does it? I even signed it, as my Mamma will love that, being a bit art lover.
Anyway, I can really recommend you trying alcohol inks if you just want to have some fun and play around a little bit. You might end up with some very unexpected masterpieces, you just never know what you are getting beforehand which is part of the fun.

Right, well, that's it from me for today but I will be back next week with more projects and inspiration!
Lots of love and happy crafting from Erica
This is so beautiful!
ReplyDeleteWOW!! This is SO COOL!!
ReplyDelete