

Hey friends!
It's Jess and I'm thrilled to be back for another post this week! The Christmas season is upon us and I don't know about you, but I've been wanting to branch out and try new things when it comes to Christmas projects this year. I saw this idea on Instagram (Jessica Frost-Ballas) and just HAD to try it out!

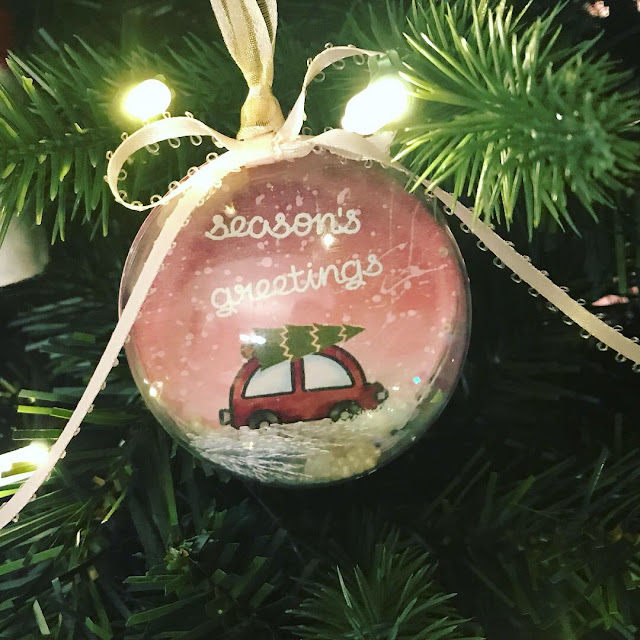
To start things off, I used the My Favorite Things Inside Out Stitched Circle Stax to cut three circles from white card stock for each ornament. This gave me six circles all together since I made two orgnaments. On two of the circles, I did some ink blending with Seedless Preserves, Worn Lipstick, and Spun Sugar. I've been loving this color combination for winter sky backgrounds this year!
Next, I used some white gesso to flick on some white drops. This gave the effect of a snowy sky. I really like how this turned out! For my ornaments, I chose two Lawn Fawn sets - Winter Skies and Home for the Holidays. These had perfectly sized stamps for this project. I colored the stamped images with Copic markers and then fussy cut them. I also used a little Marshmallow Puff embossing powder on the bottoms of my scenes to give the effect of snow.
I used these really cool ornaments I picked up from my local craft store for the actual ornament part. They split apart in the center so you can fill them and then put them back together, but I actually just used half for each ornament. This is awesome because you get double for the price of one!
I stamped a sweet message on the back of two of my circles - 'wishing you and your family a magical Christmas' so there'd be a nice message if I decide to give these as gifts. Then, I layered all of my circles together (three for each ornament). This helped make the back of the ornament more rigid so it didn't cave in if you press on the back.

I filled the ornament part with all kinds of glitter and sequins and then I glued the ornament fronts onto my die cut circles. I tied some pretty ribbons on for hanging and that finished off my ornaments. I really love the way these came out and I'm so thrilled I decided to give Jessica's project a try. So cute!
Hugs and love to you all,

It's Jess and I'm thrilled to be back for another post this week! The Christmas season is upon us and I don't know about you, but I've been wanting to branch out and try new things when it comes to Christmas projects this year. I saw this idea on Instagram (Jessica Frost-Ballas) and just HAD to try it out!

To start things off, I used the My Favorite Things Inside Out Stitched Circle Stax to cut three circles from white card stock for each ornament. This gave me six circles all together since I made two orgnaments. On two of the circles, I did some ink blending with Seedless Preserves, Worn Lipstick, and Spun Sugar. I've been loving this color combination for winter sky backgrounds this year!
Next, I used some white gesso to flick on some white drops. This gave the effect of a snowy sky. I really like how this turned out! For my ornaments, I chose two Lawn Fawn sets - Winter Skies and Home for the Holidays. These had perfectly sized stamps for this project. I colored the stamped images with Copic markers and then fussy cut them. I also used a little Marshmallow Puff embossing powder on the bottoms of my scenes to give the effect of snow.

I used these really cool ornaments I picked up from my local craft store for the actual ornament part. They split apart in the center so you can fill them and then put them back together, but I actually just used half for each ornament. This is awesome because you get double for the price of one!
I stamped a sweet message on the back of two of my circles - 'wishing you and your family a magical Christmas' so there'd be a nice message if I decide to give these as gifts. Then, I layered all of my circles together (three for each ornament). This helped make the back of the ornament more rigid so it didn't cave in if you press on the back.

I filled the ornament part with all kinds of glitter and sequins and then I glued the ornament fronts onto my die cut circles. I tied some pretty ribbons on for hanging and that finished off my ornaments. I really love the way these came out and I'm so thrilled I decided to give Jessica's project a try. So cute!
Hugs and love to you all,

What a creative idea and one that can be personalized for each recipient.
ReplyDelete