

Hi Everyone! It's Jenny here and I'm so excited to be back guesting on the Butterfly Reflections Ink blog after what seems like forever! I have three cards for you today, which all feature a decoupage style technique. I'll show you how you can cut up your stamped images to create a 3D effect, and I have a video which show you how I created it in more detail which you can find here:
My first card uses the Pinkfresh Studio Lined Floral Background. I stamped it five times in copic friendly black ink and then fussy cut it out at various sections used my Copics to color it.

I colored each layer a different color of the rainbow, using three different shades for each layer. I also didn't color all of each layer - only the bit I knew would be showing. To get the edges nice and neat, I used a Memento Tuxedo Black marker to go around the edges of each piece.

Once all the pieces were lined, I adhered the main back stamped panel to some silver glitter cardstock cut just larger than the panel itself. I then added each of the layers with foam tape on top of each other, so by the fifth layer, the card has a LOT of dimension. The sentiment was die cut from silver glitter cardstock and white cardstock, layered on top of each other. I adhered the entire panel to a white notecard, then added some Nuvo Silver Moondust Glitter drops to finish.

My next card uses the gorgeous Studio Katia Lovely Blooms stampset. I stamped it in Distress Ink in Antique Linen on hot press watercolor cardstock three times to do a bit of no-line watercoloring. For the main image, I watercolored the entire piece, using Altenew pan watercolors and added some spatters for good measure.

I also painted the two main blooms on one additional panel (but just the centres), and one of the blooms (the largest) on the third panel. This is quite time consuming, and you can of course paint just over the edges of what you know will be showing if you want to make it a little quicker :) - I trimmed out the flower centres and the other main bloom and edged them with Antique Linen distress ink.

I adhered them with foam tape in layers onto the main panel as I did for the first card, to build up the dimension. I heat embossed the sentiment in WOW! Rich Pale Gold embossing powder on a strip of white, and then added Antique Linen distress ink over the top. I added it popped up on foam tape.


For my main panel, I stamped the leaves from the stamp set directly onto the panel (using the floral image to work out where to stamp them. I used Midnight, Spruce and Eucalyptus inks. I also smushed the black ink on a craft mat, added some water and spattered the panel. I then adhered the layered flower to the card with Art Glitter Glue, and stamped the sentiment from the set in Rockin Red! I added the entire panel to a white notecard, and as a finishing touch, added some Morning Dew Nuvo Drops to the the flower!
I hope this gave you some ideas on how you can use your stamps to create extra dimension - I've loved being back guesting again - hope to see you again really soon!
Jenny x
My first card uses the Pinkfresh Studio Lined Floral Background. I stamped it five times in copic friendly black ink and then fussy cut it out at various sections used my Copics to color it.

I colored each layer a different color of the rainbow, using three different shades for each layer. I also didn't color all of each layer - only the bit I knew would be showing. To get the edges nice and neat, I used a Memento Tuxedo Black marker to go around the edges of each piece.

Once all the pieces were lined, I adhered the main back stamped panel to some silver glitter cardstock cut just larger than the panel itself. I then added each of the layers with foam tape on top of each other, so by the fifth layer, the card has a LOT of dimension. The sentiment was die cut from silver glitter cardstock and white cardstock, layered on top of each other. I adhered the entire panel to a white notecard, then added some Nuvo Silver Moondust Glitter drops to finish.

My next card uses the gorgeous Studio Katia Lovely Blooms stampset. I stamped it in Distress Ink in Antique Linen on hot press watercolor cardstock three times to do a bit of no-line watercoloring. For the main image, I watercolored the entire piece, using Altenew pan watercolors and added some spatters for good measure.

I also painted the two main blooms on one additional panel (but just the centres), and one of the blooms (the largest) on the third panel. This is quite time consuming, and you can of course paint just over the edges of what you know will be showing if you want to make it a little quicker :) - I trimmed out the flower centres and the other main bloom and edged them with Antique Linen distress ink.
I adhered them with foam tape in layers onto the main panel as I did for the first card, to build up the dimension. I heat embossed the sentiment in WOW! Rich Pale Gold embossing powder on a strip of white, and then added Antique Linen distress ink over the top. I added it popped up on foam tape.

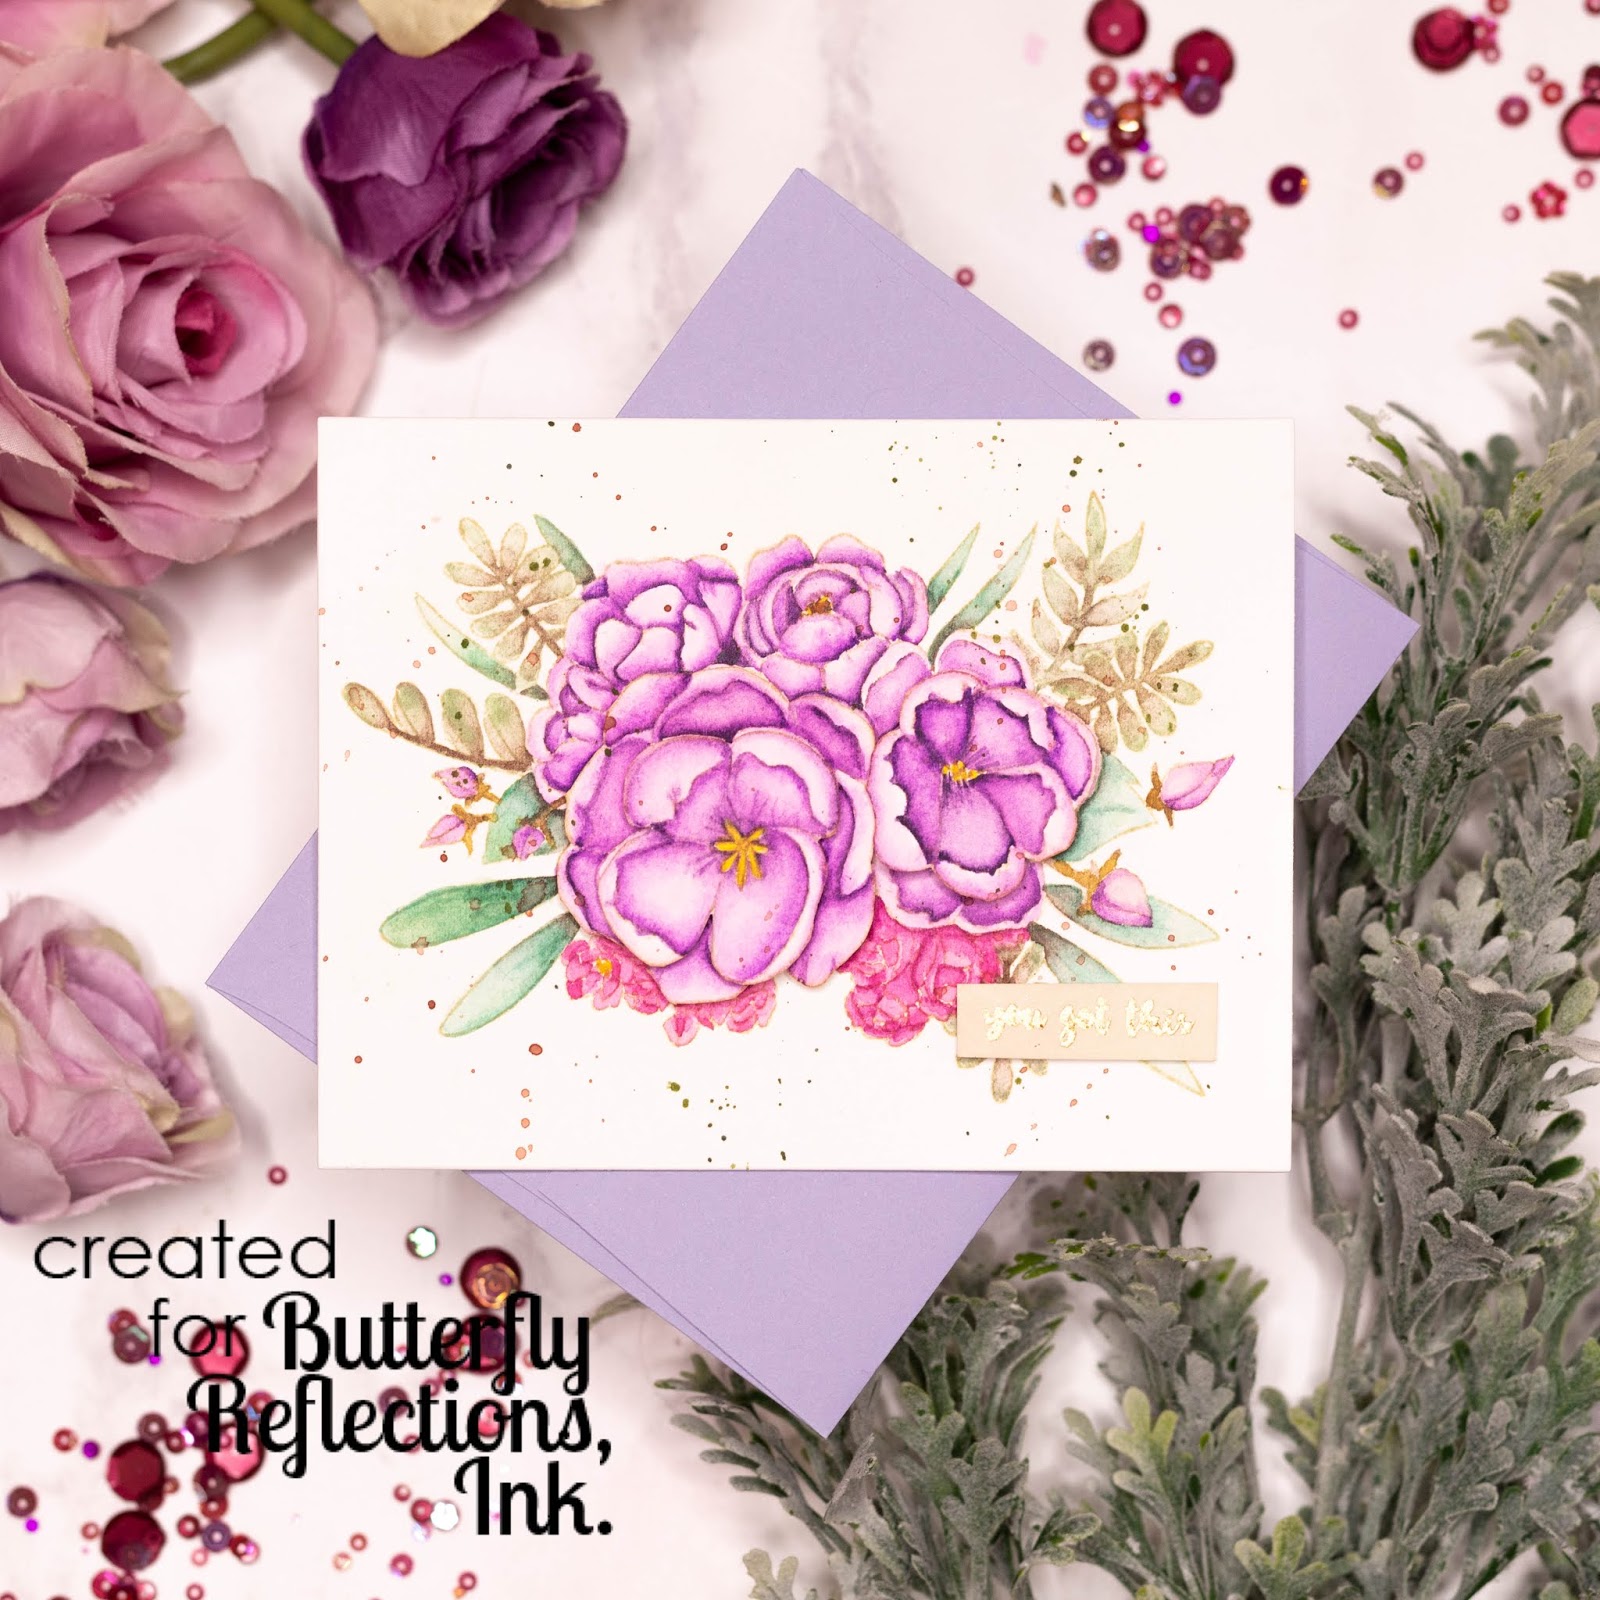
My final card shows you how you can do this if you don't have the patience to paint the images! I used Altenew's Beautiful Heart which is a layered stamp set (so no watercoloring), AND has a great outline petal image perfect for fussy cutting a few different ways.
I stamped the main floral image four times using Catherine Pooler inks in Midnight, Polished and Rockin' Red. I trimmed out the petals three different ways and the fourth image I trimmed out in full. I then adhered all of the layers together with foam tape.

For my main panel, I stamped the leaves from the stamp set directly onto the panel (using the floral image to work out where to stamp them. I used Midnight, Spruce and Eucalyptus inks. I also smushed the black ink on a craft mat, added some water and spattered the panel. I then adhered the layered flower to the card with Art Glitter Glue, and stamped the sentiment from the set in Rockin Red! I added the entire panel to a white notecard, and as a finishing touch, added some Morning Dew Nuvo Drops to the the flower!
I hope this gave you some ideas on how you can use your stamps to create extra dimension - I've loved being back guesting again - hope to see you again really soon!
Jenny x
These are STUNNING!!! I cannot imagine how much time this takes to make one card but the result is just breathtaking!
ReplyDelete