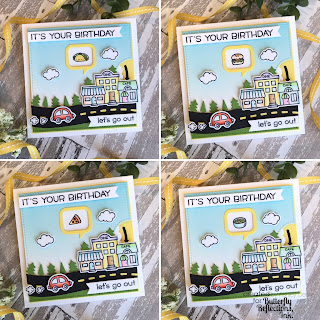
Happy Thursday crafty friends, Ashley D. here! I’m back today with another fun food-themed
card featuring some more great new products from the Lawn Fawn Spring 2019
release. I’m so excited to finally have some
fun little food images with the new Lawn Fawn Plan On It: Meal Planning! I definitely
see a bright future for these little guys in my creations to come. Who doesn’t love to go out to eat on their
birthday? So, I decided to create a fun
dining out card featuring a create-your-own-adventure type theme using the clever
Lawn Fawn Reveal Wheel interactive die.
To begin, I created a simple ink-blended background by using Distress
Oxide Tumbled Glass and Broken China on Bristol Smooth cardstock. I cut it out using the Lawn Fawn Reveal Wheel Square Add-On with the Speech Bubble Reveal Wheel Add-On. I also cut a second stitched square from the same die in plain white cardstock to act as a backer for the future assembly. To create the “meal options,” I die cut the
reveal wheel components from the standard Lawn Fawn Reveal Wheel die.
If you’ve used this set before, you know that
getting the alignment just right for the stamped images featured in the rotating
window required a little effort. But
never fear, the new Reveal Wheel Templates are here! These awesome little plastic guides are
created from the same material as your favorite stencils and are super easy to
use, and clean (if need be), and come in two sets covering eight popular window
shapes (Essential Shapes and Seasonal Shapes). I like to tape the guide over my
reveal wheel and then onto my MISTI, and stamp away! But you could totally stamp the images by hand too. Either way, the stencils make it so simple, easy, and fast! For my wheel I used the cute food images from the new Lawn Fawn Plan On It: Meal Planning.
After the wheel was stamped, I
colored the food with Copic markers (Taco – Y11, Y15, YG11, YG13, G07, E31,
E33, E37; Burger – E50, E51, E53, E33, YR15, E37, YG11, YG13; Pizza – Y11,
YR12, YR15, YR31, R59, E51, E53, E33); Ramen – Y11, Y15, YG13, YR15, BG000,
BG01), and assembled the wheel with the included
die cut base components with a small brad and foam squares. For guidance on how to assemble the reveal
wheel visit Lawn Fawn’s great video tutorial on the item page found here. To create my scene, I die cut a road using
the Lawn Fawn Road Border in black and yellow cardstock (Paper Source Black and
Sunshine), and a tree line using Lawn Fawn Forest Border in green cardstock (Paper
Source Clover), and layered them onto the card front with Tombow Mono Tape Adhesive.
I stamped the shops, clouds, and car images
from Lawn Fawn Happy Village and Village Shops, and the car exhaust from
Lawn Fawn Happy Trails in Memento Tuxedo Black ink, colored them with Copic
Markers (Shops – E50, E51, E53, BG000, BG01, Y11, Y15, BV000, BV02, E31, E33, G00,
YG11, YG13, RV10, RV02; Car – R02, R05, BG000, N1, N4, C0, C1; Exhaust – W0,
W2, W3; Clouds – BG000), and cut them out with the coordinating dies (Happy Village Lawn Cuts and Village Shops Lawn Cuts). I attached the
images to the card with foam adhesive along with the sentiment, also from Lawn
Fawn Village Shops, die cut with Lawn Fawn Everyday Sentiment Banners. To complete the card, I attached the square
reveal wheel to a yellow square border (3-3/8” square) and then to a white card base
(4.25” square), finishing with the included speech bubble frame and arrow die cut
from the same yellow and black cardstock.
Now it’s ready for the recipient to choose their favorite dinner spot and celebrate! Happy stamping everyone!


This is so cute! I have got to play with my reveal wheel!!
ReplyDelete