
Hello and happy Tuesday everyone!! Hope everyone had a fantastic weekend! Danielle here up on the BRI blog with my first ever interactive card!! Once I saw the new Lawn Fawn Magic Picture Changer die, I knew I had to dig in and give it a go!


It is our 5 year anniversary this week so I thought I would make a card to celebrate us!! Now I have never tried doing an interactive card before mostly because I was intimidated and didn't know where to start, but this die is so easy to use and can be used with any stamps you may already have! For my first image I used the new Lawn Fawn stamp set Open Me. I loved the little sign and chicks that are in this stamp set. I stamped my sign image on a piece of smooth bristol cardstock. *Tip: you don't want to use a heavy cardstock as it may prevent from sliding* (I learned this the hard way) Now I know I wanted to do some ink blending in the background, therefore I stamped the sign image on a post it so I could mask it while I ink blended the background. I used Distress ink oxides in Mermaid Lagoon and Tumbled Glass. Then I stamped the words using Lawn Fawn Happy Happy Happy Add On-Family set. I love this set because you can mix and match and has every name for each family member. Once everything was stamped on my first panel, I ran in through my die cutting machine and as you can see it creates tiny little slits across the image.

For my second image, I wanted to try something a little different and make it more personal. I seen it before some other crafty ladies using personal photos so I thought I would give it a try. This took some trial and error as I first printed the picture on lightweight cardstock which I soon found out it ripped to easily when sliding, and too heavy of a cardstock which I found out gets stuck because it's too thick. So I did have some medium weight photo paper that worked best. Once I had my picture printed, I used the other die that comes in the set for the second portion of the magic picture changer. Now that I have both pieces cut I am ready to assemble. This was easy enough to do as you just "weave" together the pieces. *Tip: use an anti-static powder pouch to run along the edges of slides. This helps slide smoother. Seeing it change "magically" was the most fun part!! I was so excited!

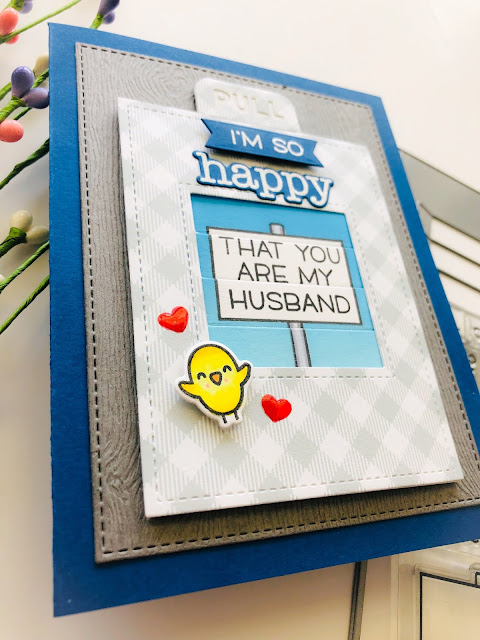
Now that my slider is all together, I used the Magic Picture Changer Add On. This add on is great because it has a large decorative frame and different pull tab. I used Lawn Fawn 6x6 Gotta Have Gingham paper pad for the frame and pull tab. This paper pad is so pretty with soft hues perfect for a lighter touch. For the sentiment I used the same Lawn Fawn Happy Happy Happy Add On Family set and the coordinating die for the word happy. I used versamark embossing ink and heat embossed using Lawn Fawn white embossing powder. I then adhered to my front panel using foam adhesive tape. For the little chick I used from the same Lawn Fawn Open Me set, colored with copic and die cut with the coordinating die. I adhered using foam adhesive. I added some red hearts around the chick with red dye ink and added some Nuvo Glaze to add dimension and a little love! I adhered to a piece of Lawn Fawn Wood Grain Neutrals Cardstock. I love this cardstock as it's textured with a real wood grain look. Plus I thought it was perfect for a more masculine feel.

I hope you enjoyed this card and inspires you to try more interactive cards!! This was fun to make and I hope my hubby likes just as much!! Make sure you stop by the shop to pick up these fabulous new goodies!! Have a great rest of your week and I'll see you next Tuesday! xoxoxoxo

Comments
Post a Comment