
It's a Cocoa Party!

Hello friends and happy December!  This is Crystal here today and before I get to my card, I wanted to share with you all that I got to visit the Butterfly Reflections, Ink store last weekend when I was nearby traveling for Thanksgiving!  Not only did I get to check out the awesome store, but I got to meet Vanessa in person, and on her birthday! I was amazed by the amount of inventory in the store and the space is so well organized and clean.  I didn't even get to see nearly everything I wanted and I was there for almost two hours!  I can't wait to go back again (without my husband)!


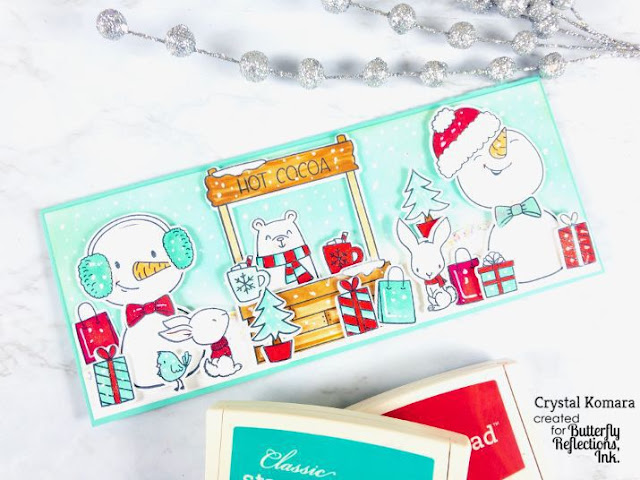
Now for today's card. . . I used a stamp set that I purchased when I was at the store last week, although it has been on my list since it was released.  This set is called "Cocoa Stand" by Avery Elle.  I did also combine it with the "Snow Buddies" stamp set from Honey Bee Stamps  to create an even larger scene.  For the base of this slimline card, I cut a piece of turquoise cardstock measuring 8 1/2" x 3 1/2" long. I cut a 8 1/4" x 3 1/4" piece of Bristol Smooth cardstock to ink blend the background.  I used Tim Holtz Distress Oxide ink in Peacock Feathers and covered the cardstock with the ink before adhering this distressed background to the card base.  


I cut a 8 1/4" x 1 1/4" piece of white cardstock and created a snowbank along the bottom edge of the cards to ground all of my images.  Along this border, I added Lawn Fawn Chunky Glitter for added sparkle.  I stamped all of the images from the Cocoa Stand stamp set in Memento Tuxedo Black ink on Neenah Solar White Smooth cardstock and colored them with Copic markers.  I then used the coordinating Cocoa Stand Elle-ment dies to cut all the images.


I also stamped all of the images from the Honey Bee Stamps Snow Buddies stamp set in Memento Tuxedo Black ink on Neenah Solar White smooth cardstock and colored these images with Copic markers.  I also die cut these using the Snow Buddies Honey Cuts dies.  Then I began to form a scene just by placing the different images onto the card to where I was happy with the layout.  I adhered most of the images to the card with foam adhesive.  Lastly, I used a white gel pen and added little dots all over the card to resemble snow. 


I hope you have enjoyed today's fun and festive card! Thanks for visiting and happy creating!

XO, Crystal

Comments

Popular posts from this blog

Baby Tags featuring the We R Memory Keepers Fuse Tool!

Happy Monday! This is Kim Hamilton and I am so very excited to be sharing my first post with you for Butterfly Reflections Ink! This is making my first day back to work after a two-week break a happy one! I am sharing baby gift tags today, one of my friends is expecting and not sure what she is having so I made one of each! I used my  We R Memory Keepers Fuse Tool  for the first time and loved it! I cut my own  Tim Holtz watercolor paper  to the size of tag I wanted (2 3/4 x 4 1/4) and cut the edges with my trimmer.  I stamped my sentiments that are by  Lawn Fawn Hello Baby  with VersaMark ink and used white embossing powder. For the girl tag I used a mix of Spun Sugar, Picked Raspberry and Abandoned Coral  Distress Inks  and for the boy tag I used Peacock Feathers, Cracked Pistachio and Twisted Citron  Distress Inks .  I sprayed both tags with some water and dabbed it off. I then stamped my images by My Favorite Things  Snuggle Bunnies  for the girl and Magical Dragons for th

Painting backwards....

Hello, hello!  Norine here from The Velvet Lemon blog .  It's been a week for introductions hasn't it, but let me just say how delighted I am to have been invited to join such a talented group of paper crafters, and to contribute here at Butterfly Reflections Ink!   Today I'm sharing with you, some cards I made by working backwards.  What do I mean, you wonder?  Well, it's a technique I sometimes enjoy doing, where you "smoosh" your water based ink pads on a craft mat, mist the colors with water and then drag your water color paper through it to create a pretty mess of color.     For today's cards, I wanted a blend of blues and greens (always a crowd pleaser) and yellows/pinks.  You will always be happier with the results when you keep the green/blues from overlapping with the yellow/pinks, because that just produces an unappealing mud color.   I used a variety of Tim Holtz Distress Inks for this project, but any water based inks w

Altenew’s 4th Anniversary Blog Hop Day 3 + Giveaway

Hey, hey BRI friends!  We're hopping today to celebrate the 4th Birthday of Altenew , one of our favorite stamping companies!  You should have arrived here from the Altenew blog , and we're glad you're here to share the excitement! There are prizes and inspiration and it's going to be FUN! With you today, is Norine from The Velvet Lemon  creating for Butterfly Reflections Ink  and I have some projects to share today, that I made using some recently released Altenew products .   First up, are these two cards created with the Mega Succulent stamp set .   I stamped the image onto water color paper using the MISTI , then turned on the music and sat and colored.   I used Faber Castell watercolor pencils so I could more easily control where the color would sit and then painted with a water brush .  I stamped the sentiment onto a piece of vellum, heat embossed with clear embossing powder to ensure that the ink wouldn't smudge, then tore the vel