
Have a Really Cool Christmas Card


Hi Crafty Friends! Stephanie here with a new mini slimline shaker Christmas card! 


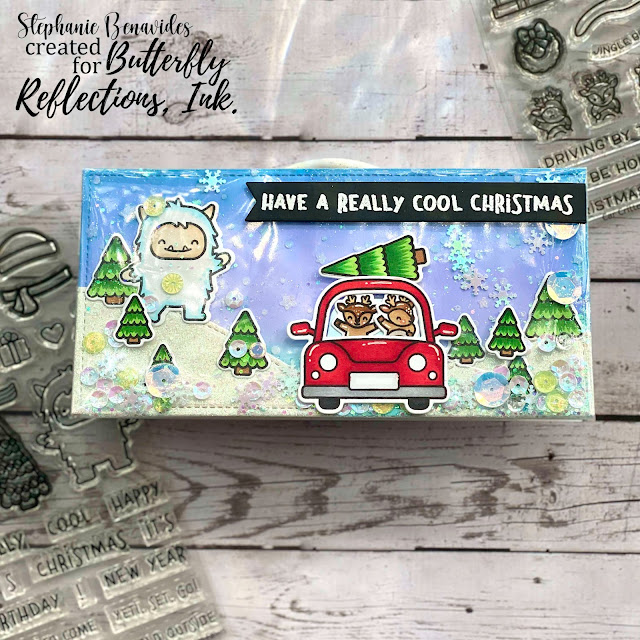
I have been wanting to try making a full shaker card and a mini slimline, so I combined them! I started with the largest of Lawn Fawn's new Large Mini Slimline Stackables dies. I die cut one slimline card base from white cardstock and one from white glitter cardstock to use as snow later. I then ink blended the sky with Shaded Lilac Distress Oxide. I added in some snow and stars to the sky with Lawn Fawn Pixie Dust Paste with a stencil. While the paste was drying, I colored the stamped images. I stamped the car and tiny deer from the Car Critters and Car Critters Christmas Add-Ons sets. The cute Yeti and trees are from the Yeti or Not. All the images are colored with Copic markers. 


I took the glitter cardstock mini slimline I die cut earlier and used the Lawn Fawn Stitched Hillside Borders to make snow drifts on either side of the card. In the middle of the card, where the card will go, I inked in some Salvaged Patina Distress Oxide. I wanted the blue to look like melting snow for the car to drive on. I also added in a little Peacock Feathers Distress Oxide near the very top of the card. Once I was happy with the background colors, I glued down the snow drifts, the trees and the Yeti. 


Next, I made my shaker element. I took some plastic packaging I saved from a stamp set and cut it to about an inch bigger than the card. I laid 1/8" Scor tape around the edge of the back of the card. I wrapped the plastic around the card and sealed it except for the top edge. I then poured in a little bit of glitter and snowy colored sequins. I folded and sealed the top edge of the plastic. I added a bit more tape to keep it secure. This really was the easiest shaker card I've ever made! 

To finish the card, I added the Critter Car and a couple of trees on top of the plastic so the sequins will shake behind them. I embossed my sentiment with Ranger embossing powder and die cut with a banner die cut. The sentiment is also from the Yeti or Not stamp set. 

I had so much fun making this shaker mini slimline card! Thanks for joining me and have a wonderful day! 

Comments

Popular posts from this blog

Baby Tags featuring the We R Memory Keepers Fuse Tool!

Happy Monday! This is Kim Hamilton and I am so very excited to be sharing my first post with you for Butterfly Reflections Ink! This is making my first day back to work after a two-week break a happy one! I am sharing baby gift tags today, one of my friends is expecting and not sure what she is having so I made one of each! I used my  We R Memory Keepers Fuse Tool  for the first time and loved it! I cut my own  Tim Holtz watercolor paper  to the size of tag I wanted (2 3/4 x 4 1/4) and cut the edges with my trimmer.  I stamped my sentiments that are by  Lawn Fawn Hello Baby  with VersaMark ink and used white embossing powder. For the girl tag I used a mix of Spun Sugar, Picked Raspberry and Abandoned Coral  Distress Inks  and for the boy tag I used Peacock Feathers, Cracked Pistachio and Twisted Citron  Distress Inks .  I sprayed both tags with some water and dabbed it off. I then stamped my images by My Favorite Things  Snuggle Bunnies  for the girl and Magical Dragons for th

Painting backwards....

Hello, hello!  Norine here from The Velvet Lemon blog .  It's been a week for introductions hasn't it, but let me just say how delighted I am to have been invited to join such a talented group of paper crafters, and to contribute here at Butterfly Reflections Ink!   Today I'm sharing with you, some cards I made by working backwards.  What do I mean, you wonder?  Well, it's a technique I sometimes enjoy doing, where you "smoosh" your water based ink pads on a craft mat, mist the colors with water and then drag your water color paper through it to create a pretty mess of color.     For today's cards, I wanted a blend of blues and greens (always a crowd pleaser) and yellows/pinks.  You will always be happier with the results when you keep the green/blues from overlapping with the yellow/pinks, because that just produces an unappealing mud color.   I used a variety of Tim Holtz Distress Inks for this project, but any water based inks w

Altenew’s 4th Anniversary Blog Hop Day 3 + Giveaway

Hey, hey BRI friends!  We're hopping today to celebrate the 4th Birthday of Altenew , one of our favorite stamping companies!  You should have arrived here from the Altenew blog , and we're glad you're here to share the excitement! There are prizes and inspiration and it's going to be FUN! With you today, is Norine from The Velvet Lemon  creating for Butterfly Reflections Ink  and I have some projects to share today, that I made using some recently released Altenew products .   First up, are these two cards created with the Mega Succulent stamp set .   I stamped the image onto water color paper using the MISTI , then turned on the music and sat and colored.   I used Faber Castell watercolor pencils so I could more easily control where the color would sit and then painted with a water brush .  I stamped the sentiment onto a piece of vellum, heat embossed with clear embossing powder to ensure that the ink wouldn't smudge, then tore the vel