
Merry Christmas Card by Sara Zoppi

Hi BRI friends, Merry Christmas everyone! Sara here!
Today it’s my turn on the BRI blog and I’m here to show my inspiration for the December BRI Mood Board.


This is a perfect palette for Winter cards, I really love those cold colors mixed with silver. But since today it’s THAT day, the most important of the Holiday Season, I wanted to create a Christmas card. And this is my inspiration!


I must admit I recently saw a bokeh patterned paper that was my inspiration for this card. So I couldn’t resist to create my own version, using the colors of the Mood Board. I used blending brushes and Distress Oxide Inks in Black Soot, Chipped Sapphire, Tumbled Glass, Pine Needles and Shabby Shutters. I applied a layer of colors, with a really soft hand. 


I then used some nesting dies to create circles with masking paper and I applied a few, added another layer of color (image 1) and then I added other circles (image 2: some of them overlap). I repeated the process until I was happy with the effect.
I then took the Pretty Pink Posh Layered Bokeh Stencil and I removed some color using a wet wipe (image 3) and I splattered some water to create small drops. The fourth image shows you the final background when all the masking paper was removed.
To complete the background, I die cut it using the largest of the Trinity Stamps Modern Embossed Rectangle.

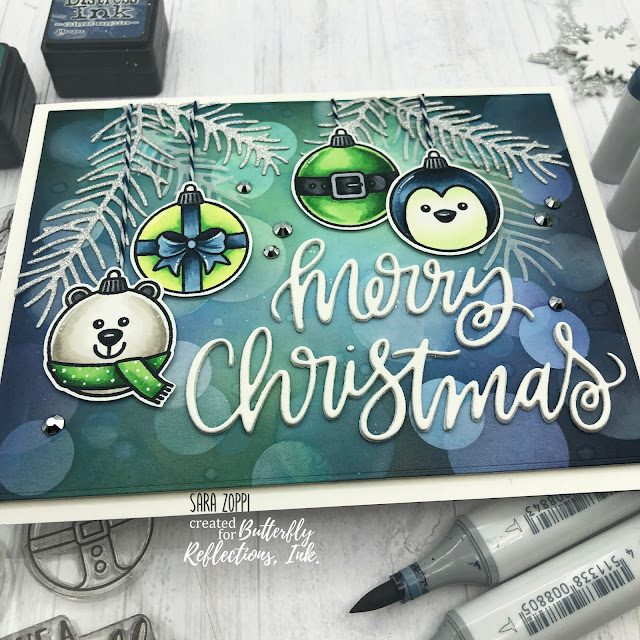
When the background was done, I started working on the images and the layout of the card. I stamped some of the ornaments from the Sunny Studio Stamps “Deck the Halls” and I colored them using copic markers. I then die cut them using coordinating dies.
I also die cut three times the Pretty Pink Posh “Merry Christmas Script” die to create dimension to my sentiment.


For the pine branches I die cut the branches from some Silver Glittery Cardstock and some vellum paper.
I glued everything down using a combination of foam tape and liquid glue, in order to create dimension. I also added some blue and white twine to “attach” the ornaments.
As a finishing touch, I added some Silver Diamonds here and there, they really catch the light and I matted the whole scene using a larger piece of white paper.
 
And now, since it is my last project of the year, I just want to thank you all for the support. I really hope to have inspired you playing with the mood boards, I hope you will like this project too! Thanks so much Vanessa for giving me this opportunity!
I wish you and your families a wonderful Holiday Season and all the best for the upcoming year. Merry Christmas everyone!

Hugs from Italy,
Sara

Comments

Popular posts from this blog

Baby Tags featuring the We R Memory Keepers Fuse Tool!

Happy Monday! This is Kim Hamilton and I am so very excited to be sharing my first post with you for Butterfly Reflections Ink! This is making my first day back to work after a two-week break a happy one! I am sharing baby gift tags today, one of my friends is expecting and not sure what she is having so I made one of each! I used my  We R Memory Keepers Fuse Tool  for the first time and loved it! I cut my own  Tim Holtz watercolor paper  to the size of tag I wanted (2 3/4 x 4 1/4) and cut the edges with my trimmer.  I stamped my sentiments that are by  Lawn Fawn Hello Baby  with VersaMark ink and used white embossing powder. For the girl tag I used a mix of Spun Sugar, Picked Raspberry and Abandoned Coral  Distress Inks  and for the boy tag I used Peacock Feathers, Cracked Pistachio and Twisted Citron  Distress Inks .  I sprayed both tags with some water and dabbed it off. I then stamped my images by My Favorite Things  Snuggle Bunnies  for the girl and Magical Dragons for th

Painting backwards....

Hello, hello!  Norine here from The Velvet Lemon blog .  It's been a week for introductions hasn't it, but let me just say how delighted I am to have been invited to join such a talented group of paper crafters, and to contribute here at Butterfly Reflections Ink!   Today I'm sharing with you, some cards I made by working backwards.  What do I mean, you wonder?  Well, it's a technique I sometimes enjoy doing, where you "smoosh" your water based ink pads on a craft mat, mist the colors with water and then drag your water color paper through it to create a pretty mess of color.     For today's cards, I wanted a blend of blues and greens (always a crowd pleaser) and yellows/pinks.  You will always be happier with the results when you keep the green/blues from overlapping with the yellow/pinks, because that just produces an unappealing mud color.   I used a variety of Tim Holtz Distress Inks for this project, but any water based inks w

Altenew’s 4th Anniversary Blog Hop Day 3 + Giveaway

Hey, hey BRI friends!  We're hopping today to celebrate the 4th Birthday of Altenew , one of our favorite stamping companies!  You should have arrived here from the Altenew blog , and we're glad you're here to share the excitement! There are prizes and inspiration and it's going to be FUN! With you today, is Norine from The Velvet Lemon  creating for Butterfly Reflections Ink  and I have some projects to share today, that I made using some recently released Altenew products .   First up, are these two cards created with the Mega Succulent stamp set .   I stamped the image onto water color paper using the MISTI , then turned on the music and sat and colored.   I used Faber Castell watercolor pencils so I could more easily control where the color would sit and then painted with a water brush .  I stamped the sentiment onto a piece of vellum, heat embossed with clear embossing powder to ensure that the ink wouldn't smudge, then tore the vel